Showing posts with label pasta. Show all posts

Wednesday, June 5, 2013

Food at Work: Pistachio Crusted Salmon

Today's entry is one that is my chef's signature dish.  I made this dish a few weeks back and it sold very well.  Today was no different. I made over 140 portions and sold out.  It combines salmon, which is always popular with a different way of preparing it.  So many times salmon is just grilled or baked that it can get boring.  So thanks to Chef Victoria Cloud for the recipe.

Executive Chef Victoria Cloud
The first step for me to make this dish was to portion out my salmon.  At work we get in whole salmon fillets.  Usually I start by taking off a small portion from the belly side and one from the tail end just to give the fillet a better shape to portion with.  I personally don't like to take off the skin because I like the skin and I also find it is easier to remove it once the fish is cooked if I must take it off.  I then cut my individual portions trying to get them from 4-5 oz.  Now, for those of you at home, you don't necessarily have to cut off what I do and you can make your portion size however big you want.  Truthfully though, I would not make them much bigger because the bigger the fish, the longer it will take to cook.

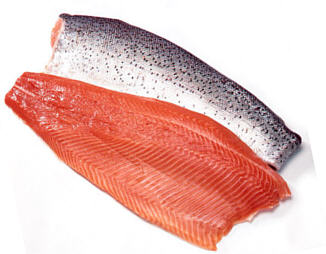
The next thing I do is to make my crust.  Essentially what I do is take some pistachios and peanuts and chop them up in a food processor.  Now, you want them to be almost like a corn meal consistency.  If there are a few big chunks of nuts here and there, that is ok.  The one thing you want to be careful of  is to over process.  If you do that you start to have nut butter instead of meal.  Once you have processed your nuts, you mix them with sesame seeds and a little olive oil.  I have also found that if you are short on nuts, you can add some panko or bread crumbs to help stretch it out.

Now, the first time I made this dish I seasoned each portion of salmon individually.  This time around I seasoned the crust mixture itself.  In order to crust the fish it could not be easier.  All you have to do is place it in a dish with sides and press the fish into it placing each finished portion on a sheet pan sprayed with cooking spray.  The fish's natural moisture will help the crust to stick and cooking it in the oven will finish the job.

Once you have crusted all your fish all you have to do is stick them into a 350F degree oven for about 10-15 minute or until the fish is firm but flaky. (145F degree internal temp)  The fish will be nice and cooked and your crust will be nice and toasted.  


The salmon was laid upon a bed of capellini pasta. The capellini (angel hair) pasta I cooked according to my guidelines with a few notes.  Because capellini is such a thin and delicate noodle it is very easy to over cook to such a degree that it can actually be perfectly cooked in your pot of water and over cook by the time you take it out of the water and cool it down.  The key to cooking capellini is to under cook it slightly.   Take it out of the water when it is still just a bit too hard.  Even if you plan on serving it immediately, it can still over cook with the residual heat from the water.


The salmon was served with Sauteed Harvest Beans with Mushrooms.  Harvest beans are a fancy way of saying green beans.  To make my beans all I did was saute some garlic in oil to get it nice and aromatic.  I then added my mushrooms and let them cook until mostly soft.  I seasoned the mix with salt and pepper.  At this point I added my green beans and let them cook.  In this case I used frozen green beans.  Fresh is best but frozen is also good, especially if they are flash frozen.  I then seasoned everything with salt, pepper and Italian seasoning.


The salmon was covered with a very tasty roasted garlic butter sauce.  I started off by cooking some minced garlic in oil.  In order to make two gallons of sauce I used about a cup and a half of garlic and maybe a cup of oil.  I let the garlic cook until it started to get brown.  You have to take care because garlic can go from brown to burnt in the blink of an eye.  Once the garlic was brown I added about a cup of flour and let the cook stirring constantly to make a roux.  I let it cook for about a minute or two and which point I added two quarts of cream stirring the while added the cream so as not to get lumps.  I also added a gallon and a quarter of water.  I let the mixture heat up to a soft boil, stirring occasionally.  While the cream and water was heating up I cut into pieces three pounds of cold butter.  Once the liquid was hot, I slowly incorporated the butter adding a couple of pieces at a time and stirring until they mostly melted before adding more.  After all the butter was added I added salt and white pepper.  The result was a creamy, velvety sauce for my salmon.


Monday, June 3, 2013

Perfect Pasta Postulated

    Cooking pasta is one of those things that is quite easy to do, but also quite easy to screw up.  Nothing ruins a good Italian meal like over cooked, gummy, and stuck together pasta.  Here are some dos and don'ts for cooking up magnificent macaroni, fabulous fettuccine, or splendorous spaghetti.

DO have plenty of water when you are cooking pasta.  Having plenty of the wet stuff gives pasta room to move around when it is cooking.  You see, movement is a key factor in pasta cookery.  Without it pasta has a tendency to stick to itself.  The rule of thumb I have heard is one gallon of water per pound of pasta.  Generally I just get a pot big enough to hold two to three times the volume of pasta and fill it 3/4 of the way up.

DO allow the water to come to a rolling boil before you toss in your pasta.  You want that water nice and hot because the moment you add your pasta, it will bring the temperature of water down.  If your water is nice and hot it will recover nice and quickly.  The reasons you don't want water to be anything less is that pasta takes longer to cook in cooler water and more importantly, pasta will again want to stick to itself.  When water is boiling, the movement of the water helps move the pasta.

DO use a lid.  It helps the water boil faster and it will help the water recover after dropping in your pasta.


DON'T just toss in your pasta and walk away.  You need to give it at least an initial stir to help the individual noodles get space and separate from each other.  This is especially true with your long, string-like pastas.  Otherwise you may end up with big clumps of pasta.  Hopefully you can see how important movement is in cooking pasta.  In fact, you may want to stir your pasta every once in a while just to make sure there is movement between the noodles and that they are not sticking.

DO try to add all of your pasta at one time.  What I mean by that is if you have to do batches, then you have to do the process all over again for each batch unless you have something like a basket that you can dip and take out of the hot water.  Whatever you do, DON'T add half your pasta, wait for it to cook a little while then add some more.  This will assure you have unevenly cooked pasta. 

DO salt your water.  Adding salt to your water is really the only way to impart flavor directly to your pasta.  One of the things I learned in culinary school is to season everything and do it in layers.  Without adding salt to your pasta, it will taste bland.  I know it will probably be tossed in sauce and have other stuff added to it, but trust me, salted pasta is so much better.  As far as how much salt, well, I always  try to get my water to the salinity of sea water, but that is my personal choice.  You kind of have to play around with it so that you know how much salt to add to the water to get the pasta to where you like it. Now, when you add the salt you can either add it at the very beginning or wait until the water comes to a boil. If you add it at the beginning you can taste your water, but it will take the water longer to boil.  If you wait until the water is boiling then you don't have to wait as long but you have to taste you water as it were a hot soup.

DON'T add oil to your water.  It serves no purpose.  You are essentially just wasting oil.  It will pretty much just hang out at the top and never even come close to mixing with the pasta, even with all the vigorous boiling.  DO, however, oil your pasta after you are done cooking it.

DO be patient.  I can't tell you how long the pasta will take because every pasta is different.   Just keep an eye on it and keep tasting it.  If the pasta is still hard, it is not done yet.  You want pasta to be what they call al dente.  This means the pasta is firm, not hard, but can be easily chewed.  Once you have reached this point, your pasta is ready.

DO be careful when draining your pasta. You will pouring hot water down the drain that will still release copious amounts of steam. Use a colander big enough to hold your all your pasta but without hole big enough that will allow your noodles to escape. It is at this point that you want to oil your pasta.  Any oil will work, but a nice olive oil will add flavor to your pasta.  You want just enough oil to coat your pasta.

Now you have two choices.  You can immediately serve the hot pasta, or you can cool it down.  The fastest way to cool down hot pasta, I have found, is to use a combination of ice and water.  Just pour some ice over your pasta then pour water over it all until the ice melts away. As a side note, when cooling your pasta this way it may wash away some of the oil, so you may want to reapply a bit more.  When you are ready to reheat your pasta, you can do it in a sauce or with hot, not boiling, water.  Just give your pasta a dunk to freshen them up and serve.  For the sauce method just toss your pasta with really hot, temperature not spice, sauce and serve.

Hopefully these tips help the next time you want some pasta perfection.