Showing posts with label pork. Show all posts

Wednesday, February 24, 2016

Tales from the Market Part 2: Swiss Chard, Cremini Mushroom & Pork Empanadas from Rice Farmer's Market

Last week I was invited to the Rice Farmer's Market.  The purpose of this visit to the farmer's market was not just to indulge in some chit chat with vendors.  I was brought along to write about my experience and to show people what could be done with ingredients bought at the farmer's market.  When I arrived I had some preconceived notions of what dish I might concoct.  I thought I was probably going to end up making a delicious salad with all the vegetables I was going to get.  But as I went along and started looking at all the different ingredients, I started to tinker in my mind and and come up with a world of possibilities, especially if I allowed myself some ingredients from outside of the market.  What I ultimately ended up deciding to make was a Swiss chard, cremini mushroom and ground pork empanada. The chard, mushrooms and green onions all came from Animal Farm Center and the ground pork from Shiner Pork and Beef.

My goodies from the Farmer's Market

Five buches of Swiss Chard

Two bunches for green onion

About two pounds of cremini mushrooms

Three cloves of garlic

A little over a pound of ground pork
As well as these ingredients I also used two sheets (one package) of puff pastry and about a 1/4 cup of egg beaters for egg wash.

Whisk the egg with about two tablespoons of water for the perfect egg wash.


First I prepared my vegetables.

Chop and wash the chard

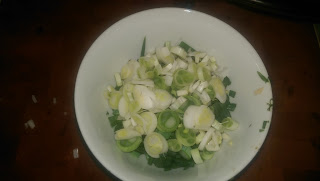
Slice the green onion

Slice the mushrooms

Mince the garlic
Next in a large pan I added my ground pork to allow it to start browning.  Normally I would start with a little oil and saute my garlic until it was aromatic.  The pork however, had a good bit of fat, so I decided to let that render out, then add my garlic and let it cook in that fat.  I made sure my heat was not too high as I did not want my meat to burn before browning. I also added just a little salt and pepper to season the pork.  I was taught that when preparing a dish it is always good to season in layers.

Allow your pork to start browning on medium heat and for the fat to render out.

Add your garlic and let it cook in the pork fat.
Next I added my mushrooms and the white parts of the green onion.  The idea is once again to let the mushrooms and onions to cook in the fat of the pork.  I once again added a pinch of seasoning.

Add your mushrooms and whites of the onions.

Stir to make sure everything gets incorporated and cooks evenly.
After I let the mushrooms cook for a while I finally added the chard.  I let the mixture cook for about ten minutes, stirring occasionally, so that the chard could also cook down.

Add your chard and allow it to cook down.

Mixture after stirring.
The last thing I did was to stir in the remainder of my green onions off the heat, taste it and adjust the seasoning.  After I tasting I decided that the mixture did not need any more salt, but a pinch more pepper. Then I let it cool off a bit.

Add remaining green onions and taste. Adjust seasoning accordingly
While I was cooking my mixture I made sure to pull out my puff pastry and allowed it to thaw out.


Thaw and stretch out your puff pastry.
While the mixture was cooling off, I stretched out my puff pastry and cut each sheet into six squares.

Tip: add a little flour to the surface you are cutting the pastry on so it does not stick.
Next, take I took a  couple of baking pans and sprayed them with cooking for baking spray.

This makes sure that the empanadas don't stick after baking.
I then lined the squares on the baking pans so I could make my empanadas.  I lined up the squares as evenly as possible.

Not the most even, I know.
Then I spooned about a tablespoon of the mixture into the middle of each square then I brushed the edges with a little egg wash. After that I simply folded the squares in half to form a triangle and pinched the edges shut using a fork.

Spoon about a tablespoon's worth of mixture in the middle of each square.
Fold each square in half and pinch the edges closed with a fork.
After the empanadas were assembled I simply brushed each one with egg wash before going into the oven.

Brush each empanada with egg wash before going in the oven.
Now all I had to do was bake my empanadas at 350 F for about ten minutes until the puff pastry was golden brown and puffed up.  Once they came out of the oven I let them cool down, then arranged them on a platter to look nice.

Bake until golden brown and puffed. Allow to cool and enjoy!
An alternative to using puff pastry is to use pre-made pie dough.  Since pie dough usually comes in circles, it would be a good idea to use a circle cookie cutter to cut the dough into circles.  Simply follow the same procedure as if you were making the empanadas with puff pastry.  The only real difference is that if you are using pie dough you need to poke small holes in the empanadas to allow steam to vent as they cook.

Made with pie dough instead of puff pastry.

My experience with making this dish was that since I was experimenting I did not have all the amounts perfected.  That being said, if you make these empanadas the way that I did be prepared to have plenty of leftover mix.  I had enough to make a dozen empanadas from puff pasty, about twenty from pie crust and still have some left over.  That is not necessarily the worst thing in the world to happen.  I will simply freeze what I have left over and use it again at a later date.  I hope this recipe inspires you to forge your own culinary masterpiece using your local farmer's market!

Wednesday, November 12, 2014

Two Hour Ribs


Now that the weather is turning cooler some might think that BBQ season is over.  I mean who wants to stand out in the cold over a grill for hours?  Well, for the most part I would agree with them.  BBQ is definitely more of a Spring, Summer, and here in Texas, Fall activity.  But what if I told you you could still achieve some measure of BBQ goodness without leaving the comfort of your own heated kitchen?  It is possible to make ribs with only your oven and in only two hours no less.  Now these are not truly BBQ ribs since neither smoke nor a grill are involved.   But they are a good cold weather substitute. They are so easy you can make them any time of year you feel like having some delicious ribs.

This technique works well with either pork spare ribs or baby back ribs.  I usually buy them when they are on special at the grocery store and just freeze them until I am ready to cook them.  When I am feeling like making ribs, I just take them out of the freezer (usually two days ahead of time) and let them thaw.

When you are ready to start preheat your oven to 375 degrees.

Caliente!

While the oven warms up you can prep your ribs.  Some will say you need to trim off access meat and fat, but I find this step unnecessary.  I like my ribs as meaty as possible and I find the fat adds more flavor. The first thing you have to do is to score your ribs.   There is a membrane on the back of the ribs that you can either remove entirely or, what I do, is just cut cross hatched marks on the back of the ribs.

You know what the score is.

After the ribs have been scored you want to season your ribs.  You can keep it as simple as salt and pepper or use your favorite rub.  I have used a wide variety of rubs including a Southwest, Cajun and BBQ rubs.  Make sure your ribs are well seasoned.

Season with abandon.

Once your ribs are ready you will need to place them in an aluminum roasting pan with a rack to hold the ribs.  The rack will keep the ribs elevated above the cooking liquid.

The hardware.
Place the ribs in the roasting pan.  Depending on the size of your pan I would do two to three so that there is minimal overlap.  I usually only do two racks of ribs so I only really need one pan.  After the ribs are in add enough liquid to the bottom of the pan so it come up to but does not cover the wire rack.  You can simply use water, but I like to use beer for some extra flavor.  Shiner Bock Beer works really well. Once this is all assembled, simply cover your roasting pan with aluminum foil (make sure it is sealed tight) and put it in the oven for an hour. 

A tasty package!

My wife being a goof!
After the hour is up remove the pan from the oven and uncover it.  Be careful as steam will have accumulated with the cooking process!

Steamy!

These ribs just got out of the sauna and are not dressed. Do you mind!

Next you will need a bottle of your favorite BBQ sauce.  I personally love Stubb's BBQ Sauce.  Simply brush on the BBQ sauce liberally.  The ribs are not done yet, but they will look and smell delicious!  Now just put them back in the oven.

Like Picasso or Michelangelo.

Back in the hot!

At the half hour mark you will want to take them out and reapply more BBQ sauce, and back into the oven for another half hour.

Getting close.

Saucy!

Once the next half and hour goes by pull out your ribs.  They should be done.  What I mean by this is that they should be nice and tender and juicy.  That being said not all ribs and ovens are created equally.  If you find out your ribs need a little more time, just pop them back in the oven for in fifteen minute intervals until they are done.  When your ribs are done you have two choices.  You can cut them as is, or if you like your ribs extra saucy, just apply another coat of BBQ sauce.  Either way I would let the ribs rest for about fifteen minutes before cutting them.

Almost ready.

It is now time to slice up your ribs! The easiest way is to flip them over so the concave side is up towards you and follow the bone.  This can get tricky sometimes, especially on the ends, as the bones begin to fan out.

Use a sharp knife.

Ready for consumption!

 Now that you have cut your ribs make yourself a plate and enjoy!!

You know you want some!!


Tuesday, April 8, 2014

Blackened Pork Chops with Creole Peppers, Onions, Okra and Tomatoes


My wife had defrosted some pork chops for dinner, but we were unsure of what to do with them.  Fortunately my cast iron skillet had been left out.  That served as the inspiration for me to make blackened pork chops.  As a vegetable/sauce, I thought that a Creole themed vegetable would make perfect sense.  Here is what you need:

4 4oz pork chops
Blackening spice
2-3 tbsp high smoke point cooking oil
1-2 can diced tomatoes
1-2 green bell pepper julienned
3-4 ribs celery, sliced
1 white or yellow onion julienned
3-4 cloves of garlic, chopped
1 cup frozen okra
Creole seasoning
4 cups cooked white rice

The first thing you want to do is to preheat your oven to 350 degrees as you will finish the pork in the oven.  Next season both sides of the pork chops with the blackening spice.  For the spice you can either purchase one or make your own

After the pork is seasoned you are going to want to sear it in a very hot pan.  A cast iron skillet works best for this.  However, if you don't have one, just use a regular saute pan.
Next you nee to get your pan nice hot.  A good way to test the pan is to drip some water into it.  If it sizzles and skips right away the pan is ready.  Add about a tablespoon to a tablespoon and half of oil to the pan, just enough to cook the bottom of the pan. Traditionally blackening is done with butter, but I find butter has a tendency to burn, especially if you are not used to working with it at such high temperatures. For this same reason you will want to use an oil with a high smoke point such as canola, corn, or grape seed. DO NOT use olive oil.  It is too delicate and will burn!   When the oil is also hot, which should not take too long, add your pork chops to the pan.  The pork will want to stick to the pan.  This is OK as this is part of the sear and you are developing flavor and color.  You will know hen it is time to flip the chops over as they will no longer stick to the pan and will have a beautiful color.  If all the pork chops don't fit into the pan, then sear them in batches.


 After the chops have been seared just place them on a sheet pan with a rack so that they can go into your preheated oven.  The chops should take about 15-25 min., depending on how well done you want them.
While the pork is cooking in the oven you can work on the sauce.  First step is to heat a pan large enough to hold all your ingredients and add the rest of the cooking oil.  Next saute your onions, bell peppers, celery and garlic.  As they are cooking season them with some of the creole seasoning.  As with the blackening spice, you can purchase some or make your own
After the vegetables have softened a bit, add your frozen okra. Stir it and allow the okra to thaw a bit.
Once the okra is incorporated, add your canned tomatoes.
Stir and allow to simmer while the pork is finishing in the oven.  Taste it and adjust the seasoning. 

After the pork is done (I like to pull my pork out at 135-140 degrees) you are ready to serve your meal.
To serve simply place a cups worth of cooked white rice on your plate.  Lay a pork chop over the rice and top with about a cups worth of sauce/vegetables.  If you like spiciness, just add some Tabasco or Cajun hot sauce to your dinner.

Now just enjoy!