Showing posts with label tips. Show all posts

Sunday, April 26, 2015

Wine Bottle Opening: A How To


Wine is good.  A lot of people enjoy wine.  But how many know how to properly open a bottle?  This thought occurred to me while I was attending a function hosted by a friend of a friend.  During this great social event we sampled a great many wines from different countries.  As more and more bottles were opened it became very apparent that our gracious host had no idea how to properly open a bottle of wine. Not wanting to be rude I kept my mouth shut and at the end of the day the bottles were opened and we were able to enjoy the wine.  But I was still amazed at the lack of this simple knowledge.

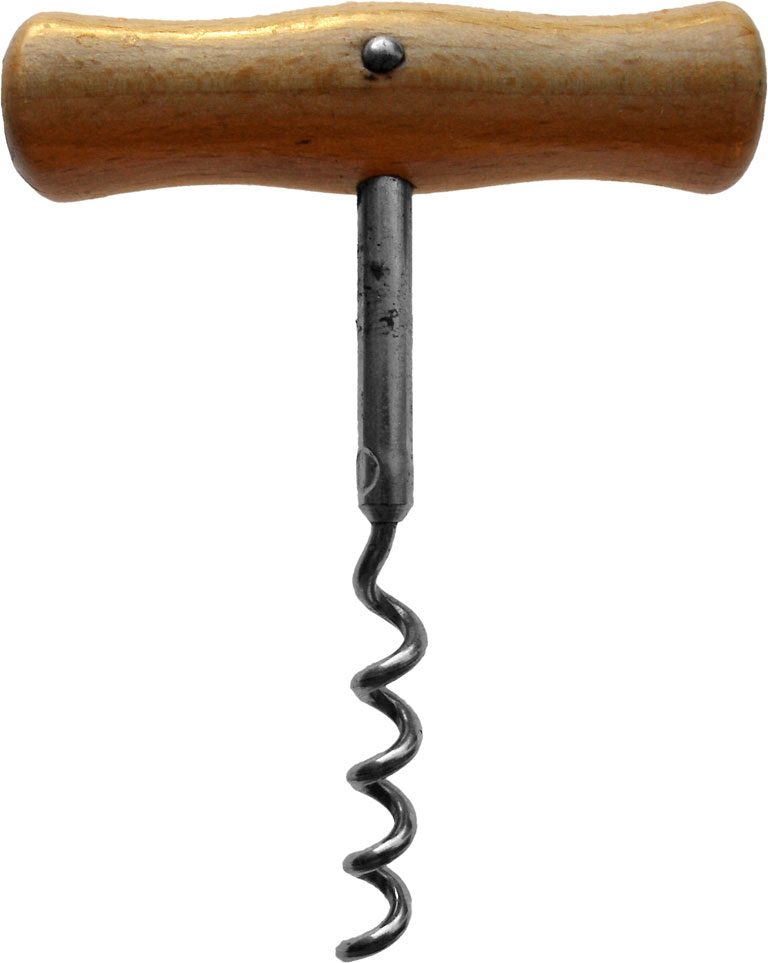
Before we get into the nuts and bolts of how we have to review hardware.  Nowadays there is a multiplicity of options to get your bottle open.  The basic corkscrew is just a piece of metal twisted in a helix fashion (known as the worm) fixed to a handle.

Next we have the wing corkscrew.  It is also known as the butterfly or angel corkscrew.  The name is due to the dual levers that resemble a pair of wings.


A more complicated wine opening apparatus is known as the sommelier knife, waiter's friend, or wine key.  This corkscrew resembles a small pocket knife with the worm being folded into the handle when not in use.  The wine key also has a metal arm that folds to cover the worm and serves as a lever when opening the bottle.

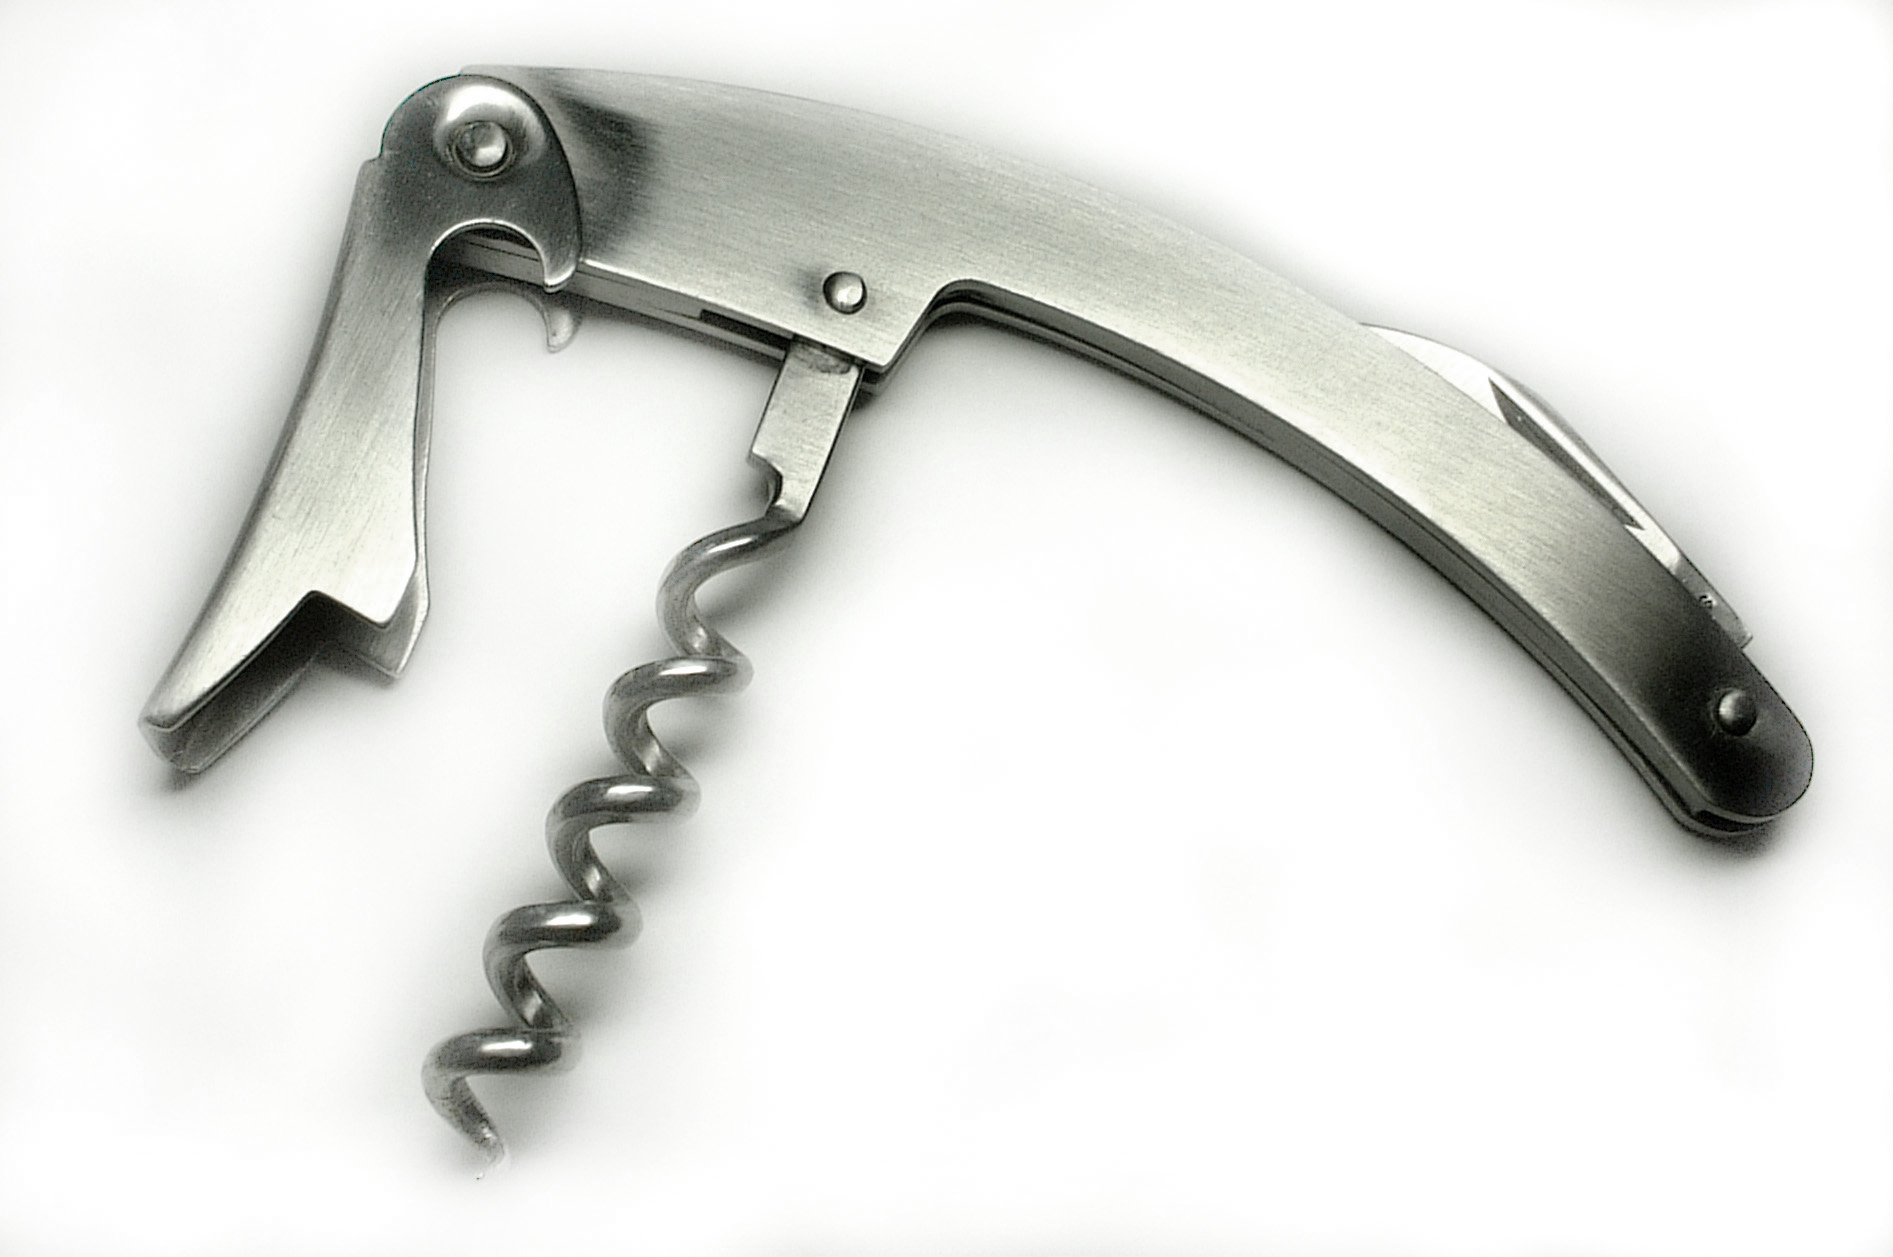
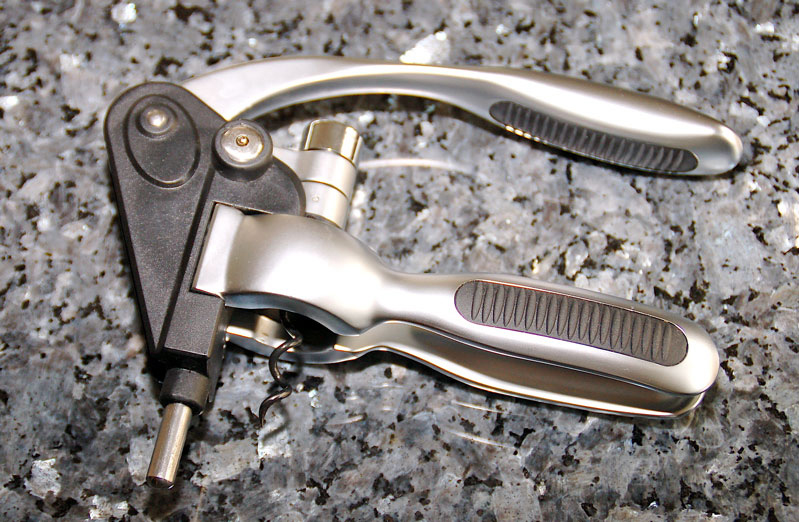
 The last device I will be discussing is a lever or rabbit corkscrew.  This device uses a pair of handles which are used to grip the neck of the bottle, and a lever which is simply pressed down to twist the screw into the cork, then lifted to extract the cork.


First lets take a brief look at the anatomy of a bottle.  The bottle consists of a neck, shoulder, body, and the heel or punt. The parts we are concerned with are from the neck up. The neck is narrower than the rest of the bottle so it may hold the stopper, often known as a cork due to cork being the primary material used to make the stopper in the past.  The opening is also called the finish and often has a slightly wider ring known as the collar.  The collar is an important part to opening a bottle of wine.

 The first step to opening a bottle of wine, no matter which device you use is to remove the foil covering the neck.  More specifically it is only necessary to remove the part covering the finish, or just from the collar up.  Completely removing this foil allows the wine to flow easily from the finish of your bottle.  The best way to remove the foil is to simply use a run a small knife around the bottle at the tip of the collar.  This will score the foil so that it may be peeled off.  A wine key more often than not has a small blade attached to it for this purpose.

This model has two small teeth imbedded in the body.

Once the foil has been removed it is time to extract the stopper.  The basic corkscrew requires that the user grips the handle and screws the metal point into the stopper then use brute strength to pull out the stopper.  The wing corkscrew facilitates this by using a mechanical means to remove the stopper.  As a person screws the worm into the stopper, the levers, or wings, lift up due to the dual gears.  Once the worm is fully inserted the user simply needs to pull down the levers and the stopper will lift out of the bottle.  The gadget that is probably the easiest, fastest, but also the most cumbersome and expensive is the lever corkscrew.  To use this device a person simply need to place the worm over the stopper, lower the lever and then lift.  The corkscrew does the rest.

The device that requires the most skill to use, but which I consider to be the most elegant, is the wine key.  It is a nuanced mechanism that combines form and function.  It is small enough that it can be carried in a pocket.  That is why is also known as a waiter's friend, since waiters will carry one on their person with ease.  Its design is simple enough that it can be made inexpensively. The "key" is knowing how to use one.  The truth is that it is really not that hard once you know what you are doing.

After the foil has been removed the first step is to open the key so that it resembles a basic corkscrew.


Next screw the worm into the stopper until it is firmly embedded in the stopper.


This is where a great many people go wrong.  Once the helix is in there, most people would just pull on the wine key as if it were just a basic corkscrew.  Buy doing this they are eliminating the advantages of the wine key.  No, the next step is to tilt the body of the wine key so that the metal tab lines up with the collar of the bottle.  If the bottle happens to lack a collar, it might be possible to align the tab with the opening.


Now use the metal tab as a lever to pull up the stopper.  This is done by lifting on the opposite side of the wine key. If necessary use both hands: one to apply the levering action and the other to hold the metal tab in place.


The cork should clear the opening, but if it does not it should be far enough out of the bottle that it can easily be pulled out the rest of the way.


Now that you have your bottle open the next step, which is the easiest, is to simply enjoy your libations! 

Friday, March 20, 2015

Cutting Up Bell Peppers: Updated


Bell peppers, also known as sweet peppers,  are a great and dynamic vegetable giving us multiple ways to use them.  From simply stuffing them, to dicing them as a garnish, to cutting them into slices it all depends on what the intended use for the peppers is.  

The most common way for people to prepare their peppers is to simply slice them down the middle and scoop out the seep pod, stem and some of the white veins.   While this method is not terrible, it does make making precision cuts a bit more difficult. There is another method that is much more elegant and gives you greater adaptability with your peppers.  


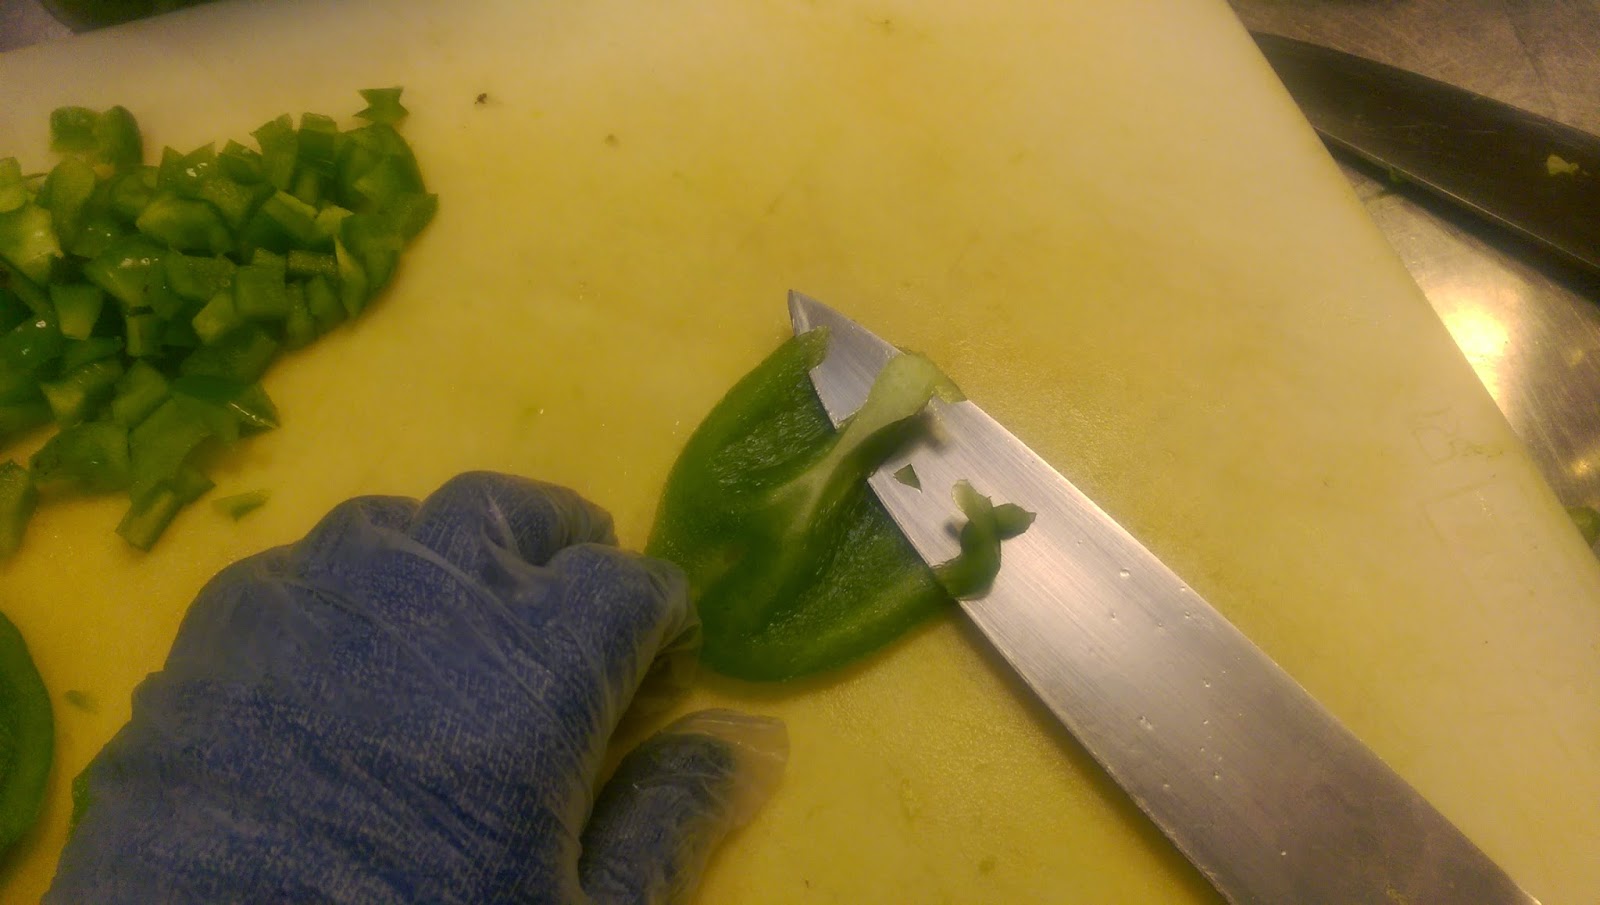
The first step to cutting your pepper is to remove the stem end.  Simply cut about a fourth to a third of an inch from stem end. This serves the purpose of partially removing the stem while still taking advantage of the pepper around the stem.


Now you have a stable surface to continue cutting from.  The next step is to start cutting the sides of the pepper into flat surfaces.  The easiest way to do this is to cut a line at the obvious edges, then detach the sides from the seed pod by cutting the white membrane.  After this is done cut the bottom piece off the seed pod. You will be left with three or four flat sides, the bottom surface and the seed pod intact without any messy seeds all over your bell pepper.


If you want to get really fancy, you can always remove the excess white membrane left on your pepper.  This is kind of an advanced technique and not absolutely necessary. To remove the membrane simply lay your pepper flat and run your knife along the inside removing the membrane.


Now with your peppers deconstructed you have the freedom to do what you need. You can leave the sides whole as they are perfect for grilling. You can simply cut them into strips for a julienne. 


Or take it a step further and dice them up.  The ring leftover from the initial cut serves perfectly for this purpose.   In either case you can decide how big or small your cuts are. 


Using this method of cutting bell peppers gives you a more elegant and cleaner way of preparing them then the traditional way.  The beauty of it all is that it really does not take any more effort than before and you have more control and get a higher yield from your peppers.  This method works great not only on bell peppers, but on most fresh peppers.  So give this technique a try and see if your peppers come out looking beautiful. 

Thursday, September 26, 2013

Polenta's Potential Predicated

Polenta. What is it exactly?  It sounds like something exotic and crazy.  But really, it is such a simple dish that has the potential to be extraordinary!  For those of you who grew up in the south, polenta is no more than Italian grits.  Now I know some will cry out that "Grits and polenta aren't the same thing!"  Well, yes and no.  You see polenta and grits share some very fundamental and basic attributes.  Polenta and grits are both essentially dried ground corn that is slow cooked in hot liquid to make a porridge like concoction.  Both can be cooked with water alone, but we all know they are better with butter and cream.  And both can be creamy and runny or as hard as mortar. The key differences are really what they are made of and what you put in them.  Polenta is generally made with ground yellow cornmeal while traditional grits are made from hominy.  Polenta has an Italian slant to it, meaning that any spices or seasoning as well as cheese added to it will be Italian.  Grits usually are associated with Southern cuisine and served as a side dish with little to nothing added although cheesy grits are an exception. 

Now that we have that comparison out of the way, lets talk more about polenta.  At work I have become somewhat of an expert polenta maker.  In fact, I had to save my sous chef's polenta when he was about to do a chef's table!  That polenta turned out so well that one of our customers insisted on the recipe (provided below).  Since I usually make large quantities and I usually make mine by feel and instinct, I had to sit down and think about it.


So what makes a good polenta?  The first thing you have to know about polenta is how you want to serve it. As stated previously, polenta can be creamy and almost fluffy like good mashed potatoes, or nice and firm like a piece of cornbread.  Knowing what you are going to do with your polenta before you start goes a long way to achieving that goal.  Next, you have to let the polenta dictate how it will cook and how much you will need.  As much as a recipe calls for certain amounts and times, it really comes down to how the food behaves and how you react to that.  Lastly, good polenta takes fat and calories.  It is difficult to make really good polenta that is low cal.

Here are a couple of tips and tricks for good polenta making:

When buying your ingredients, don't be fooled into buying fancy packages of "polenta mix".  It is all just cornmeal.  The cornmeal is just as good for about a third of the price.

Don't get cornflour.  You generally want coarsely ground cornmeal.  Cornflour is just really finely ground cornmeal. For whatever reason, I have found that it does not make for good polenta.  It just ends up grainy.

Polenta will continue to cook even after you take it off the fire.  That means it will get thicker.  Take it off the heat a bit before your desired consistency.  Keep in mind when you are adding your cheese that it will also add density.

If your polenta ever ends up too thick or dense, just add some hot liquid to loosen it up.  At work I use hot water from the pasta machine.

If you are transferring your polenta to a serving dish, spray your dish and whatever utensils you are using to transfer with cooking spray.  This makes serving it easier. 

For firm polenta that can be cut into shapes, add enough cornmeal to make it difficult to stir, but not impossible.

When making polenta for cutting, make sure you spread it in your dish or baking pan before it sets.  You can now cool it and save it for later.  Once you are ready to serve it, you can reheat it by baking, grilling or searing it.

Polenta is versatile.  You can add anything from mushrooms to sundried tomatoes.  Get creative.

Recipe:

1 cup milk (2% works well)
1 cup cream
1/2 cup water
2-3 cloves of garlic minced (garlic powder works in a pinch)
3-4 tbsp Italian Seasoning  or fresh herbs1/2 to 1 cup coarsely ground cornmeal (grits can serve as a substitute)
1/4 to 1/2 cup grated Parmesan or your favorite Italian cheese
1/4 to 1/2 stick of unsalted butter
Salt and Pepper to taste (if you can, use white pepper)

Mix your milk, cream and  water in a sauce pan big enough to hold double the volume of the liquid.

Add your minced garlic to the liquid. You can also choose to add the dried herbs now, or wait until later.  If using fresh herbs, it is best to wait.

Heat your liquids on medium high heat until they simmer.  Do not allow liquid to boil over or scorch on the bottom. 

Once the liquid is simmering, begin to add the cornmeal a little at a time slowly, whisking continuously to avoid lumps.  As the cornmeal cooks it will thicken slightly.  Once you have reached your desired thickness, lower the heat.

Add your cheese, butter, seasoning and herbs(if you have not done so already).  Keep stirring the mixture until the cheese and butter are completely incorporated.
 

Serve and enjoy!

Saturday, August 10, 2013

Thickening Agents

In the culinary world more often than not you have to add viscosity and body to something you are preparing, whether that be a soup, a sauce, or a stew.  Luckily for the cooks of the world there are a variety of methods for doing just that.  Each method has its own pros and cons as well as a preferred application.  The most traditional and most commonly used methods is through the gelatinization of starches. Some other methods include reduction and adding an already thickened substance.  When you thicken something your goals should be to avoid lumps, have a good clean taste that is not pasty or floury, have a good consistency and that it will not separate or break when being held.

One of the most classic methods, and generally one of the first taught is the use of roux.  At its most basic roux is simply equal parts flour and fat (by weight) that have been cooked together to make a paste.  Roux varies by color gradient ranging from white, blond, and brown roux.  You achieve a darker color roux by cooking the flour and fat longer.  The color of the roux plays a part in what you are using the roux for.  White roux is used for things that are either white in color or where no added color is wanted.  Dark roux is used in dark colored items, such as gumbo.  Another important note is that as you cook a starch you remove some of its ability to gelatinize in liquid, so you will need more dark roux than lighter roux to thicken the same amount of liquid.

The procedure for making a roux is the same no matter what the color.  First heat your fat in a heavy bottomed saucepan taking care not to burn it.  After the fat is nice and hot add your flour.  General purpose flour is ok to use, but pastry or cake flour work better for roux making due to the higher starch content.  Avoid high gluten flour.  Stir your flour and fat mixture until you reach your desired color.  White roux does not take very long while dark roux can take several minutes.  When you are cooking your roux it is important to watch over it and constantly stir it.  Roux, especially when making dark roux, can go from tasty thickening agent to burnt disgusting mess in an instant.  Burnt roux does not thicken anything and will make your food taste bad.  A little trick I have learned for making dark roux without constantly watching over it is to put your roux on a sheet pan (cookie sheet with four sides) and put it in a 200 degree oven until you reach your desired color.  A good roux will have a nice almost nutty smell and will be slightly stiff, nor runny.

When you have made your roux you can incorporate it into your food in two ways.  You can let your roux cool down and add it to hot liquid, or you can add cold liquid to your hot roux.  In either case it is important to stir vigorously with a whisk so that the liquid and roux are properly incorporated and you avoid lumps.  After your roux has been added you need to allow your liquid to heat up to a boil.  This will cook out any of the flour taste and allow the starch to gelatinize.

Another way to use flour and fat(butter) to thicken items is to make a beurre manié.   Beurre manie is equal parts flour and butter, by weight, that have been kneaded together.  The mixture is then whisked slowly into a simmering liquid to thicken.  Unlike roux, the mixture remains uncooked and it generally added at the end of the cooking process as a finishing technique or as a quick thickener.  The butter adds shine and flavor as it melts.

The next way to add thickness to liquids is to use cornstarch.  Cornstarch is much easier to use than roux because the only thing you need to do to use it is to mix it with water to create a slurry.  Once the cornstarch is completely incorporated with the water, just slowly stir it into hot liquid.  The liquid does not necessarily need to be boiling, but it does at the very least need to be simmering. Unlike roux, cornstarch will have a more immediate effect.  Cornstarch is used heavily in Asian cuisine.  It gives liquids a glossy sheen that may or may not be desired.  Cornstarch also has the benefit of having twice the thickening power of flour.  However, liquids thickened with cornstarch are less stable as it can lose its thickening effects over prolonged heating.  Also, products that have been thickened with cornstarch should not be reheated.

An alternative to cornstarch and flour as a thickener is arrowroot.  Arrowroot is derived from the roots of several tropical plants and is similar in texture and appearance to cornstarch.  In fact, you use it the very same way.  You mix it with cold water making a slurry than whisk that into a hot liquid.  Arrowroot has slightly more thickening power than  cornstarch, is not affected by acidic ingredients or freezing, thickens at a lower temperature than flour or cornstarch and it has a more neutral flavor.  Arrowroot however, does not work well with dairy products, producing a slimy texture when it does.  Arrowroot also has a tendency to break down when overheated and is quite a bit more expensive.

When not using starch to thicken liquids you have some options at your disposal.  The easiest is to  thicken something by reduction.  All this means is that you allow the liquid to cook down until it is reduced in volume.  This method is especially useful for making sauces or glazes.  Just keep in mind that when you are reducing something the flavor of your liquid is being concentrated into the remaining liquid.  Another way you can add viscosity to your liquids is by incorporating an already thickened liquid or item to it.  Many a time I have added tomato paste to a tomato based sauce or soup to give it the consistency I wanted.  It is also not uncommon to add thickness using demi-glace to a sauce.  Just keep in mind that your desired thickness will have to be based on what you want thickened and what you are adding to thicken it.  You can't turn an au jus into a gravy with nothing but a reduction or by adding only demi-glace to it.

One quick final note about thickening.  It is always important to try to achieve your desired thickness with whatever method you are using.  However, if you over thicken something the solution is just to add more liquid so you get it to where you want it.  You may end up with slightly more product that you had originally intended and you may have to adjust your seasoning, but that is better than serving a gravy when you just wanted a light sauce. 

Wednesday, June 12, 2013

There's nothing to cry about!

  I consider onions one of the quintessential ingredients in any kitchen.  If my kitchen does not have onions, it is not fully stocked.  I mean onions go in just about everything save for desserts.  Did you know that they have been cultivated over 5,000 years.  Native to central Asia and Palestine, the humble onion is now grown all over the world, including China, India, Russia, Turkey and of course the US.

   When purchasing onions you should look for ones that are firm with a dry, smooth, and crisp outer skin.  They should have no visible signs of mold or sprouting and free of blemishes.  Avoid onions that have soft spots as this may be indicative of the layers underneath rotting.  Fresh onions should not really have a smell when uncut.  If they have a strong odor, that means they are getting older and starting to go bad, if they are not already bad. Essentially trust your senses.  One good thing about onions is that if you discover that some of the onion has indeed turned, you can still work around that part and salvage the rest.  Just either peel off the outer layers or scoop out the middle ones that have gone bad.

   Now to cut onion first start by cutting the onion in half.


 Next cut off the bud end but leave the root end intact.  This will help hold your onion together as you cut it.


  Now peel off the top two, maybe three layers.  You want to take off anything that feels papery since this will be tough and not very good to eat. 
 

The next steps can be a little tricky.  For half moons,  just cut parallel to the root end until you get close to it always hold the onion steady with the root. 


If you want to dice an onion the first cut to make after you have your halves is to cut the onion parallel to the cutting board from the cut bud side back to the root end making sure not to cut all the way through. 


Start down towards the board and work your way up making about three or four cuts depending on how big a dice you want and how big the onion you are working with is. 


The next step is to make cuts from the top of the onion down perpendicular to the root end.


 Try to make these cuts roughly about the same size as your previous cuts and once again try not to cut all the way back to the root end. 


The last cut you want to make is parallel to the root end from the top down working your way from the bud end to the root end. 


If you do this right, you will have some nicely diced onion.  


  OK, so how many of you have had the problem of teary eyes when cutting onions?  The reason this happens is because when you cut into an onion you are rupturing its cells which then release their contents.  When mixed with air, the sulfurous contents create allyl sulfate which is irritating to the eyes.  There are several easy ways to lessen, if not altogether avoid this.  First and foremost, use a very sharp knife.  A sharp knife will reduce the amount of trauma when cutting into the onion's cells, therefor reducing the amount of allyl sulfate produced.  Another way to avoid teary eyes is to cover your eyes with something like goggles or glasses.  Swimmers goggles are particularly effective.  If you don't want to look goofy while cutting your onions you can always chill them.  One hour in the refrigerator or fifteen minutes in the freezer will work well.  The chilling helps to stabilize the sulfates in the onion so that they don't mix so readily with the air to create the irritant.  Some other options are to soak it in cold water or vinegar, cut it under running water, or blanch it slightly before cutting it up.

   Onions are very versatile.  They can be eaten raw or cooked.  When they are cooked they loose the sulfurous enzymes and become sweeter, thus making them milder.  Onions are especially flavorful if they are slowly cooked in fat until they are softened.  Fresh onions keep for a good while.  Yellow onions will keep for about 2-3 months while red onions will be good for about 2-4 weeks.  Green onions will last about a week in the refrigerator.  The best way to store onions is in a cool, dry, well ventilated place.  Hanging baskets are especially good for this.  Onions should not be stored close to potatoes as they will absorb moisture causing them to rot and sprout.  Do not store onions in the refrigerator because their odor has a tendency to spread to other foods.

Friday, June 7, 2013

Food Safety

   Today's post is about something very important.  Something to help keep you and your family safe.  As much as we all love food it can make us very sick if it is not handled correctly.   Now, as a professional in the food industry I have been trained on the proper handling of food from the raw stage to serving the food to customers.  I just want to share some of this knowledge with those who are not so trained and may not know these things.

   The two greatest factors for keep food safe are time and temperature.  In the food industry we have a standard called the time and temperature danger zone. What this means is we have to keep food out of the range of temperatures between 40F degrees and 140F degrees.  If food is going to be in that range of temperatures, then it can not be held there for more than four hours total.  After four hours at those temperatures food is not considered safe for human consumption. Now I am not talking about all foods.  This pertains to what we call potentially hazardous foods (PHF).  These are things like raw meats, cooked foods, or pretty much anything you would not feel comfortable leaving outside the refrigerator once you are done serving it. The temperature range is essentially to keep hot foods hot and cold foods cold.  I know that may seem like common sense, but it gives you a specific temperature to aim for.  Not only that, but this is a standard that has been adopted by health departments so you know it has some merit. 

  As far as the time part of the equation, we have four hours total in which the PHF can be in the temperature danger zone.  That means between the time you buy the food at the grocery store, get it home, take it out of the refrigerator, and prepare it, you have four hours total.  The time does not reset just because you put your food in the refrigerator.  So take into that into consideration the next time you are at the store.  A helpful suggestion is to buy at least one insulated bag so that you minimize the temperature change of your food.  Another tip is not to dillydally with your groceries.  Get them home and into cold storage as soon as possible.

   So now that you have gotten your food home safely you can just throw it into the refrigerator all willy nilly right?  No, there is also a right way to store your food.  Essentially you want to put food in an order where the most hazardous food is towards the bottom.  They way we store food at work in ascending order is raw poultry, ground meats, whole meats, seafood, and cooked or otherwise ready to eat foods. At work, in a walk in cooler, we have a lot more space to work with.  At home it might be a little more difficult because refrigerators were not designed with this in mind.  The idea behind storing food this way is that if anything leaks or drips onto the stuff below it, it will not affect that food since it will be cooked to a higher temperature.

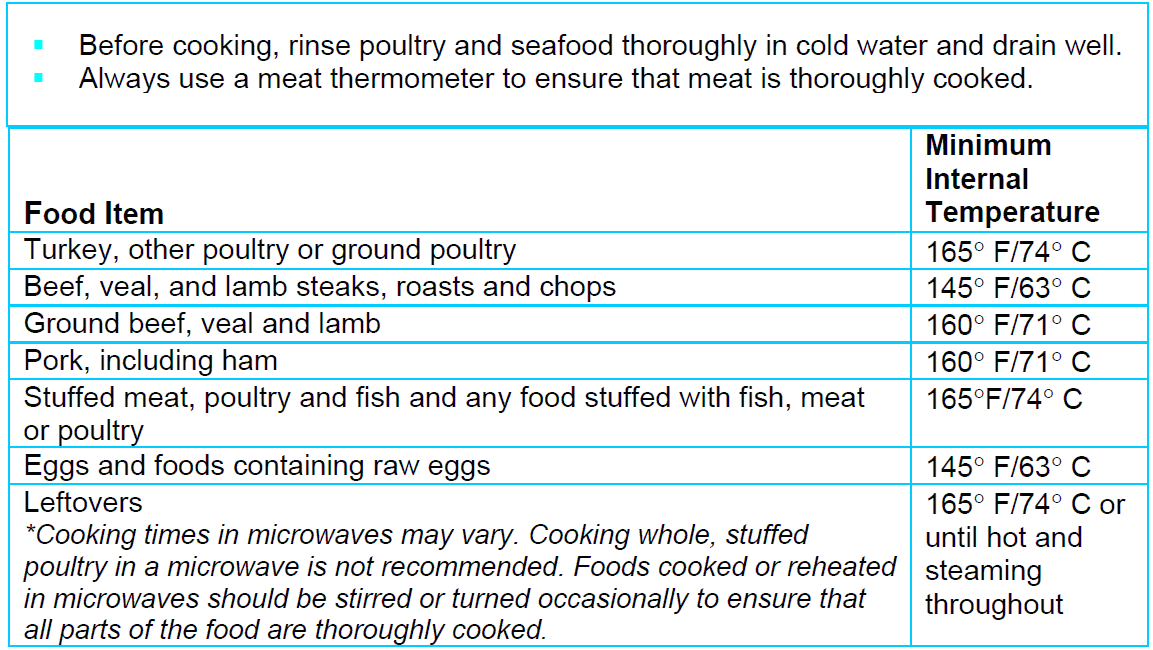
   Speaking of which, in order to keep food safe you should know what temperatures to cook foods to.  Poultry should be cooked to an internal temperature of at least 165F degrees.  Ground meats should be cooked to 160F degrees.  Pork, beef, veal, and lamb is recommended to 145F degrees.  Fish and seafood should also be cooked to this temp.  I know that some of you are thinking, well, I like my steaks more medium or rare.  That is fine, these temperatures are just what is recommended.  Except for the poultry, cooking the other meats to your personal preference is OK. 

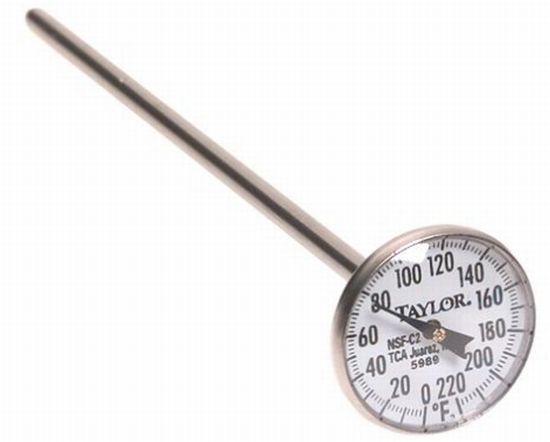
   But how does one go about checking temperatures?  Easy, get a thermometer.  There are various different kinds.  The cheapest is the instant read thermometer.  Personally I like the digital version better.  It is faster and more accurate.  You also have your probe thermometers.  These are great for anything thick that you might have to stick in the oven.  But no matter what type you choose, a thermometer is indispensable.  

  So now you have cooked your food, served and have leftovers.  What do you do?  You can cool them down and reheat later.  Just keep a couple of things in mind.  One, you need to cool your leftovers as quickly as possible.  That means if you leftovers are still hot, don't just stick them in containers, seal them, and then put them in the refrigerator.  With the lids closed it will take time for the food to cool.  The best thing to do is to put the food in the refrigerator without the lid, allow the food to cool then close it up.  You could allow the food to cool even before placing it in the refrigerator, but once again you are opening up yourself for bacterial growth since the temperature outside the refrigerator will not be under 40F.  When it comes time to reheat the food, whether in the microwave or otherwise, you need to heat it up to 165F regardless of what it is. 

  My last piece of advice is what we call FIFO.  What this means is First In, First Out.  It is the relatively easy concept of using whatever is oldest first.  Bought those bell peppers last week?  Use them before you use the ones you just bought.  I know it is easy, but it never hurts to remind ourselves of some of these simple concepts.

  I hope this has given you some insight to food safety and helps you keep a safer kitchen.

Monday, June 3, 2013

Perfect Pasta Postulated

    Cooking pasta is one of those things that is quite easy to do, but also quite easy to screw up.  Nothing ruins a good Italian meal like over cooked, gummy, and stuck together pasta.  Here are some dos and don'ts for cooking up magnificent macaroni, fabulous fettuccine, or splendorous spaghetti.

DO have plenty of water when you are cooking pasta.  Having plenty of the wet stuff gives pasta room to move around when it is cooking.  You see, movement is a key factor in pasta cookery.  Without it pasta has a tendency to stick to itself.  The rule of thumb I have heard is one gallon of water per pound of pasta.  Generally I just get a pot big enough to hold two to three times the volume of pasta and fill it 3/4 of the way up.

DO allow the water to come to a rolling boil before you toss in your pasta.  You want that water nice and hot because the moment you add your pasta, it will bring the temperature of water down.  If your water is nice and hot it will recover nice and quickly.  The reasons you don't want water to be anything less is that pasta takes longer to cook in cooler water and more importantly, pasta will again want to stick to itself.  When water is boiling, the movement of the water helps move the pasta.

DO use a lid.  It helps the water boil faster and it will help the water recover after dropping in your pasta.


DON'T just toss in your pasta and walk away.  You need to give it at least an initial stir to help the individual noodles get space and separate from each other.  This is especially true with your long, string-like pastas.  Otherwise you may end up with big clumps of pasta.  Hopefully you can see how important movement is in cooking pasta.  In fact, you may want to stir your pasta every once in a while just to make sure there is movement between the noodles and that they are not sticking.

DO try to add all of your pasta at one time.  What I mean by that is if you have to do batches, then you have to do the process all over again for each batch unless you have something like a basket that you can dip and take out of the hot water.  Whatever you do, DON'T add half your pasta, wait for it to cook a little while then add some more.  This will assure you have unevenly cooked pasta. 

DO salt your water.  Adding salt to your water is really the only way to impart flavor directly to your pasta.  One of the things I learned in culinary school is to season everything and do it in layers.  Without adding salt to your pasta, it will taste bland.  I know it will probably be tossed in sauce and have other stuff added to it, but trust me, salted pasta is so much better.  As far as how much salt, well, I always  try to get my water to the salinity of sea water, but that is my personal choice.  You kind of have to play around with it so that you know how much salt to add to the water to get the pasta to where you like it. Now, when you add the salt you can either add it at the very beginning or wait until the water comes to a boil. If you add it at the beginning you can taste your water, but it will take the water longer to boil.  If you wait until the water is boiling then you don't have to wait as long but you have to taste you water as it were a hot soup.

DON'T add oil to your water.  It serves no purpose.  You are essentially just wasting oil.  It will pretty much just hang out at the top and never even come close to mixing with the pasta, even with all the vigorous boiling.  DO, however, oil your pasta after you are done cooking it.

DO be patient.  I can't tell you how long the pasta will take because every pasta is different.   Just keep an eye on it and keep tasting it.  If the pasta is still hard, it is not done yet.  You want pasta to be what they call al dente.  This means the pasta is firm, not hard, but can be easily chewed.  Once you have reached this point, your pasta is ready.

DO be careful when draining your pasta. You will pouring hot water down the drain that will still release copious amounts of steam. Use a colander big enough to hold your all your pasta but without hole big enough that will allow your noodles to escape. It is at this point that you want to oil your pasta.  Any oil will work, but a nice olive oil will add flavor to your pasta.  You want just enough oil to coat your pasta.

Now you have two choices.  You can immediately serve the hot pasta, or you can cool it down.  The fastest way to cool down hot pasta, I have found, is to use a combination of ice and water.  Just pour some ice over your pasta then pour water over it all until the ice melts away. As a side note, when cooling your pasta this way it may wash away some of the oil, so you may want to reapply a bit more.  When you are ready to reheat your pasta, you can do it in a sauce or with hot, not boiling, water.  Just give your pasta a dunk to freshen them up and serve.  For the sauce method just toss your pasta with really hot, temperature not spice, sauce and serve.

Hopefully these tips help the next time you want some pasta perfection.

Sunday, June 2, 2013

Frittata Frenzy

So what is a frittata, you say. It sounds exotic, you say. Surely I can't make it, you say. Well, I am here to dispel these myths. Just call me a culinary mythbuster.

    To start with, what is a frittata? Well, essentially a frittata is nothing more than an Italian baked omelet. There are many differences between the frittata and its more well known French cousin, the rolled omelet. First of all, the omelet is baked to finish instead of being fried then rolled. Secondly, the ingredients that specify the type of frittata are added to the pan first and then the eggs added in stead of being incorporated into the omelet when it is being folded. And lastly, the frittat is often cut into wedges instead of being served whole or in halves. Following a few simple steps, you can make beautiful frittatas of your own.

    Lets start with the eggs. The amount of eggs depends on several factors such as how big your pan is or how many people you want to feed. For an 8-inch pan feeding about four people you will need about 6-8 large eggs. What you want to do is in a large bowl, crack your eggs then whisk them throughly. You can season your eggs with a little salt and pepper. If you feel adventurous, add a little hot sauce or some milk. It is important to whisk your eggs because that helps them puff up when you bake them.

    After you have your eggs ready, you need to start thinking of what you want to put in your fritatta. It can be as simple as ham or as crazy as sausage and corn. In this case you can think of it as you would an omelet. Add veggies or meat or just about whatever your heart desires. Now, it is important to note, that some ingredients can be added after the eggs have been introduced to the pan. however, these are more often closer to toppings that integrated ingredients. Cheese is best introduced as a topping.

    So, back to the stuff in the frittata. First thing you want to do is heat your pan. Make sure this is a pan you can transfer from the stove top to the oven without any problems. After your pan is hot add the fat, whether it is butter or oil. Once your fat is hot, introduce your ingredients and cook them throughly making sure things like raw veggies are nice and tender and no longer raw.

    Once the ingredients are cooked, pour in your eggs. It is important to note that the eggs should not stick to the bottom of the pan so make sure to scrape if possible. That being said let the eggs set a little before scraping and scrape from the center out. Another tip is to lift the edges slightly with the spatula and let the eggs run back. After the eggs are set and right before you put the frittata in the oven add your toppings.

    Now, slip the pan into the oven. It should be preheated to a toasty 400 degrees. Leave the frittata in the oven until it is golden and puffy. Time will vary according to the oven and the eggs themselves, but it should run about 8-15 min. Obviously, the larger the frittata the longer it will take. Another tip is make sure that the center of the frittata is done. Just because the edges are does not mean the center is.

    When you take the frittata out of the oven, let is rest for a couple of min. Afterwards, using a spatula to help if need be, slide your frittata out of the pan and cut it into wedges and serve hot.

    Hopefully these tips will lead you to fantastic frittata making.


Saturday, June 1, 2013

Roasting Peppers

Roasting peppers is easy, fun, and adds a level of complexity to any recipe that calls for peppers.  The peppers themselves can be used as a vegetable side dish to compliment many meals.  A lot of people are probably thinking that roasting peppers is a long involved process that takes a specialized equipment.  Nothing could be further from the truth.  In fact, any one can roast peppers.  And I do mean anyone, no matter what level of cooking expertise you have.

The Equipment

Tongs to flip the peppers
A bowl large enough to hold all your roasted peppers
Saran wrap to cover the bowl
If you have a gas stove, then all you need is the stove top.
If you have an electric, then you will need to preheat the broiler.

Method for Gas Stove

First turn on one of your burners.  Turn the heat to a medium high, to high so the flame is nice and bright.
Next, place the peppers over the flames.
You want to completely char the outside. 
Get as much of the outer part to go from its original color to black.
Use the tongs to flip your peppers as they char.

Method for Electric Stove

Once your broiler is heated, place the peppers on a sheet pan large enough to hold them.  Make sure to leave some room between the peppers.
Brush the peppers lightly with vegetable oil.  Don't use oils with a low smoke point.
Place the peppers as close to the heating element as possible.
Leave them until they are black and charred as much as possible.  (about 5-10 min.)
Flip them and repeat.

Continuation for both methods

Once the peppers are charred, place them in the bowl and immediately cover the bowl with the saran wrap. 
If you have a large number of peppers that need to be charred in batches, cover the first batch as soon as possible. 
Covering the peppers allows them to steam using the residual heat and moisture.  This in turn loosens the black charred skin and allows for easy removal. 
Let the peppers steam until they have cooled enough to handle.
Using a knife, scrape off the charred skin as much as possible.
Use the same knife to open up the pepper and remove the stem, seeds, and veins. 
Cut the peppers into desired shapes and lengths and use for what your heart desires.
If the peppers are of the spicy variety, it is in your best interest to handle them with food gloves.
If the peppers are too spicy, you can soak them in salt water to tone them down.

Suggestions for Use

There are many things you can do with roasted peppers.  Some of my favorites are roasting red bell peppers then sauteing them in hazelnut oil or roasted jalapenos and serranos for fresh salsa.  Roasted peppers make great additions to salads, or on top of steaks.  Try stuffing a chicken breast with some roasted peppers and see what happens.  There is really no limit to what you can do with roasted peppers, all you need is some imagination.

The Perfect Steak

I am sure we have all had at least one steak in our life time.  At least that is what I hope.  I also hope that when you have consumed this flesh of a bovine, it was an experience that left you satiated and happy.  A great many people only really experience good or great steaks at a steak house restaurant.  There are even some that are afraid to cook their own steaks for fear of screwing up the meat.  Steak after all is not exactly cheap.  Have no fear for I am here to impart some simple knowledge that will make cooking tasty steaks not only an easy task, but one that you enjoy.

Let's start with how to pick a good steak.  What you are looking for in your meat is a steak that is shiny vibrant red. This means the meat is still fresh and full of moisture.   If it is starting to brown or look dull, the meat is getting old and dried out.  Not sexy.  Dried out meat means less flavor.  Next look at the meat itself.  You are looking for plenty of intramuscular fat.  This is called marbling and the more marbling you have, the more flavor and juiciness your meat will have.  In fact, it is the amount of marbling that helps distinguish a choice cut of beef from a prime.  Last comes the thickness of your meat.  This is a matter of personal preference but there are some important things to consider.  Meat that is too thin will more often over cook and dry out.  Meat that is too thick will take forever to cook to where you really want it, unless you want it blue (read raw in the middle).  Chances are you will burn the outside before you get it to that perfect state of doneness.  I personally recommend a steak that is from no less than 3/4 of an inch to 1 1/4 inches.

We now have our steaks and are ready for a great steak experience.  We just need to cook them and are on our way.  Well, yes and no.  Before we get to actually cooking them we need to let them get to almost room temperature. Leave them out for about a half hour.  Why?  Well, simple really.  The steak you are about to cook is a muscle, even if it is dead.  What do muscles do?  They contract, especially if you shock them.  If you take a nice cold steak and just start cooking it on some hot grill, the muscle will get shocked, tense up and leave you with a rubbery, chewy steak.  Let your meat come up to temp. Trust me, waiting that half hour wait is worth a nice tender juicy piece of heaven.

So we have our steaks at home ready to go.  How are we going to cook them?  The most well known way is just to simply slap them on the grill and cook them that way.  There is certainly nothing wrong with that.  I enjoy a nice grilled steak as much as the next guy.  I just want to point out that there are other options out there for those of us who don't own a grill or even a grill pan or are just afraid of the outside.  You can cook a perfect steak from the comfort of your own indoor kitchen.

To me, when cooking steaks in the kitchen, nothing is as indispensable as the oven.  Yes, that is right the oven.  Now, I am not saying you are going to roast your steaks like you would, say, a roast, but you will help them cook in there.  To me the oven is the best way to help get your steaks to that perfect degree of doneness.  Just preheat that bad boy to 350-375 degrees. 

Now, don't just stick your steaks in there and call it a day.  No, there are some steps to take before hand.  One way I love doing steaks is using the good ol' saute pan.  If you have a cast iron pan, even better.  What you want to do is get this pan nice and hot.  As hot as you possible can.  Next thing you do is put your steaks in the hot pan.  There are two things you need to know when you do this.  First of all, don't add fat to the pan.  The steaks has enough fat to do its thing.  You just need to be patient and let it do its thing.  If the meat sticks, don't worry about it.  As it cooks and caramelizes the meat will "let go".  When it does, you know it is time to flip it over.  This is what we call searing the meat.  Contrary to popular belief, this does not "seal in the juices".  It does however give you nice eye appeal, a nice crust on the steak and excellent flavor. 

The second thing you need to know when searing meat is do not under any circumstances season your meat until after you have seared it.  For one thing, if you season your meat there is a good chance that you will burn said seasoning.  Nothing can ruin a tasty steak like burnt bitter seasoning flavor.  Secondly, if you season your meat the salt will draw out the moisture of the meat and make it more difficult to caramelize in the hot pan.  So show a little restraint and wait until after searing the meat.

The meat is now nice and seared, but do not be fooled.  While the outside is nice and cooked, the inside is still pretty darn raw.  Granted, some people like it this way, but most of us like our meat at least a little more well done.  This where the oven comes in.  You have two options.  If your pan is oven proof, you can just stick it in the oven and move on to other things.  If it is not, or if you want to make a pan sauce, then you will have to transfer your steaks to a baking sheet and put them in the oven that way.  While the steaks finish cooking you can make your pan sauce out of the leavings in the pan.  For how to make pan sauces, just refer to my previous article.

The amount of time the steaks stay in the oven depends on several things.  Factors such as the oven itself, how thick the meat is, how well done you like your steak all play a role in how long the steak is in the oven.  Generally I say start with a time of about 8 to 10 min.  then take the temperature of the meat.  The best way to check doneness is with a meat thermometer.  It is more accurate then the touch method and not as hard to learn.  For a rare steak you want the final temperature to be at 125 degrees.  For medium-rare you are looking for 135, medium 145, medium-well 155 and for shoe leather you are looking for 165 or over. 

Another way to use your oven is to use the broiler.  Most ovens today have a broiler setting.  The problem is most people don't even know what it is or how to use it.  The broiler is essentially the same thing as a grill.  That is to say it is a cooking method using intense and direct heat.  The only real difference is that with the grill the heat comes from the bottom up and with the broiler the heat comes from the top down.  Knowing that you can use your broiler to cook steaks in much the same way you would on a grill.  You could also used the broiler to sear your meat then finish it off in the same oven only under the conventional setting.

One thing to consider when cooking with the oven is that you want to pull stuff out about five to ten degrees before you want it to be since the meat will continue to cook for about ten min. after it has been out of the oven.  You want to let the meat rest during this time.  If you cut into the the meat, all your juices will run out and leave you a nice dry steak.

Now that you have your steaks cooking, how are you going to season them?  The perfect steak seasoning is salt and pepper.  That is it.  If you have good meat you don't need to embellish any more than that.  The salt and pepper make the flavor of the juices sing in your mouth. 

That being said, I know a great many people that will say, well, that is all fine and good, but it is boring.  Well, if you want to sass up your steak then there are endless ways to do so.  Try some crushed red pepper flakes or how about a squeeze of fresh lemon juice after the steaks are done.  Or how about making a garlic and herb compound butter and putting a pat of that on the steaks and letting the residual heat melt it into the steak.  As stated in a previous part of this article you could even make your own pan sauce for you steak.  You could try the countless rubs and steak sauces available at your local grocery store, and there is nothing wrong with that.  However, when you make that steak your own with your own seasonings and sauces, then you really have something special to enjoy.

Tortillas

If you live you the US, especially in the southwest, then you probably know what a tortilla is.  And just in case there is any confusion, I am talking about the Mexican tortilla, not the Spanish version.  I am even willing to bet that in today's global society, that people as far as England or even Japan know what a tortilla is.  However most people don't really know what to do with a tortilla.  Well, that is what I am here for.  I have grown up all my life with tortillas and are even now an integral part of my diet.

The first thing we have to cover is what a tortilla is.  This is just in case there is anyone out there who is not familiar with this Mexican classic.  The best way to put it is that tortillas are the Mexican bread.  Every culture has their own version of bread and tortillas are that to Mexican.  To be specific tortillas are like a round flat bread made from ground corn, also known as maize, or flour.  In a way they resemble pita bread or naan.  However, tortillas are not as big as naan and not as "bumpy" as pita. 

In grocery stores here, tortillas are usually found with the other bread.  In some grocery stores, there are so many different varieties (read brands), that they have their own table or shelf.  Where you live they may be a bit harder to find and only available in specialty stores. 

Now, when you do find tortillas they will often come in plastic bags and are unrefrigerated.  I find the best way to store them is to keep them in the same plastic bag but put them in the refrigerator.  This will help them keep.  And they keep for a very long time. Usually when you see mold on them is when it is time to throw them out. 

One important thing about tortillas, especially corn tortillas, is that you want to eat them warm.  Flour tortillas can be eaten as is or even straight from the refrigerator, but trust me, there is nothing better than eating a freshly warmed tortilla.  Corn tortillas are not even edible when they are cold since they are brittle, dry and starchy.  I think this is a reason so many uninformed people don't like corn tortillas.  They just don't know what to do with them. 

So now the question is how exactly does one heat these things up?  The easiest way is to stick them in the microwave and nuke them for a one to two minutes.  But that is the lazy man's way to do it.  The best way is to get a griddle nice and hot and heat them whit as many as you can fit on the griddle.  If you don't own a griddle, then a saute pan will do.  If you have a gas stove, then any self respecting Mexican, myself included, will tell you that you don't even need a pan.

The key to heating tortillas is both patience and interaction.  You see, you can't just put the tortilla down on the hot surface and wait for it to warm up.  Chances are you are going to have a smoking, blackened piece of garbage if you do that.  The tortillas are so thin that they need to be flipped over again and again.  They ensures that your tortillas will get nice and hot and not burn.  If you are good enough then you will have attractive brown spots all over your tortillas. 

The tortillas are now on the hot griddle or whatever implement you are using to heat them.  How do you know when they are ready?  The truth of the matter is, just like many foods, the tortillas will let you know when they are ready.  Corn tortillas hold heat marvelously, so the temperature alone is a good indication.  They also become very pliable and easy to fold once they are hot.  Try folding a cold corn tortilla and it will break right in two.  A flour tortilla is a little softer and pliable when cold, but the same principle applies.  The warmer it gets, the softer it gets.  If you are lucky, the flour tortillas inflate when they are getting ready.  As the air in layers of flour gets hot and expands, the tortilla inflates, and you know you are there.

Can you over cook or heat your tortillas too much?  Sure you can, but it is not the end of the world.  Provided you did not scorch them, all it means when a tortilla is on the heat too long is that it will get a little harder than you want it.  The same heat that makes the tortillas soft makes them hard after a while.  But this is how you get such things as tostadas and tortilla chips.  You just heat your tortillas until they are crispy. 

Another important aspect of tortillas is holding them.  You want your tortillas to stay hot.  Remember how I said there is nothing better than a warm or hot tortilla?  Well, there is nothing worse than a cold tortilla, especially after it has already been heated.  It gets rigid and just looses all appeal.  But do not fret for holding tortillas is really easy.  All you really need is a clean kitchen towel.  Just fold it like you would to store it in a drawer, then store your tortillas in the middle fold.  If you have a basket that you can put the towel in, then even better.

So, what can you do with your new bounty of tortillas sitting in the refrigerator?  The possibilities are endless. You don't have to limit the range of tortillas to just tacos or enchiladas.   They range from a simple snack with a bit of cheese to an accompaniment to a nice meal.  That meal does not even have to be Mexican food.  Just think of tortillas as another type of bread and you have opened yourself up to a culinary playground.